
How To Draw Anime Characters In These Easy Steps
The anime art trend began in the 1960s. They were either hand-drawn or were characters created by computers.
As an interested fan, you deserve to learn how to draw anime characters, and the steps are very simple for any medium you think is easy for you to draw faster—be it by hand, computer or tablet.
The most interesting part is there is not just one style of anime drawing, and you can bring your imagination to life.
Step-By-Step Guide On How To Draw Anime Characters
The steps below are simple tutorials on how to draw the basic anatomy of anime characters step by step.
Step 1: Sketch The Anime Character Head
To create the basic outline of your anime head, draw an oval or a circle with a circle or oval-shaped object or carry out a freehand sketch. Mark the middle of the shape you have illustrated.
Lines can be used to guide your drawing. Create evenly spaced horizontal lines from the marked middle point to the top and bottom. Aid in keeping facial features like the eyes, nose, and mouth in the proper proportions.
Tips:
If you want a wider character’s face, for your character’s head, make the bottom of the oval to be a little bit narrower than the top. Alternatively, a slim character’s head requires a slimmer bottom than the top.
However, ensure that you experiment with head shapes to find the one you like because there is no rule for a particular head figure that should be used for all anime.
Step 2: Draw Anime Eyes
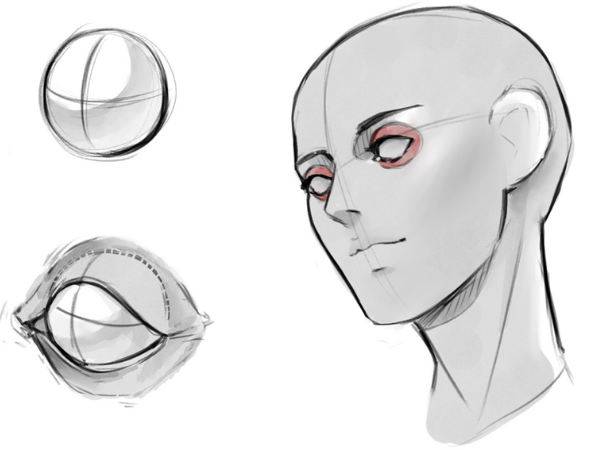
Anime eyes are usually large and exaggerated, taking up roughly a quarter of the height of the anime character’s face.
To draw anime eyes, you start the basic structure, by drawing your anime’s brows as arches across the top of the second horizontal line.
Make a couple of vertical arches with a line across the top and bottom between the third and fourth lines. These will be used to draw the outlines of your anime eyes.
Numerous techniques are used to draw anime eyes, but the simplest for a novice is to draw a semi-circle in the upper right corner of the eye circle and leave it blank while shading in the rest of the anime eyes. These results in the popular wide-eyed, anime drawing look.
Note:
There are no basic shapes and sizes for the eyes. The eyes differ, depending on if you are drawing a male or female character. Make the eyes taller and rounder for a more feminine look. A few lashes should be added, coming off the upper lash line. For a male character, make the eyes shorter and smaller for a more masculine appearance. Choose an anime eyes style that complements the look you want to achieve.
Read More: The Best Anime Shows On Netflix
Step 3: Draw The Anime Brows Above The Horizontal Line
To draw each brow, make a long downward curvy line. They should be a little bit longer than the upper lash you drew for each of the anime’s eyes. At the center of the face, thicken the ends of the brows.
Tips:
For creating apparent male brows, allow them to thicken and become prominent to produce a more masculine appearance. And for a more feminine appearance, make the brows fairly thin.
Step 4: Draw The Anime Nose
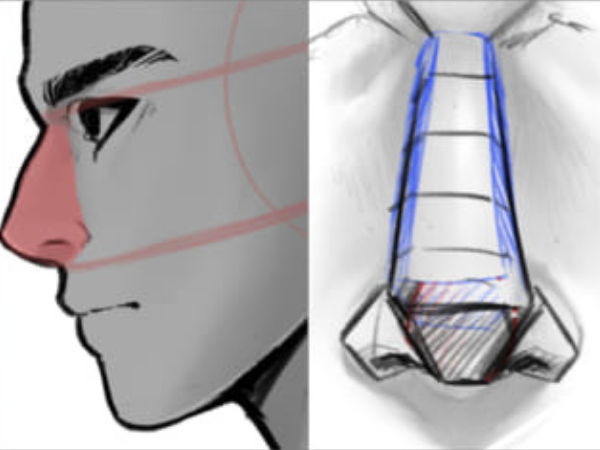
Anime noses are meant to be subtle. They are usually visible from the side view. Draw the nose between the horizontal line and the chin.
First, you draw a short, simple vertical line along the center of the face halfway between the horizontal line and the chin to draw your character’s nose.
If you want your character’s nose to be big, make the line longer. The nose will cross the vertical line you drew. Make it darker than the vertical line, or erase the vertical line around the nose, to make it more visible.
Draw a short horizontal line under the vertical line to represent the bottom of your character’s nose if you want it to stand out more. Also, make triangle-shaped shadows on the side of the nose to make it appear as if the light reflections are from the side.
Note:
Ensure your character’s nose is the smallest feature on their face. A prominent nose is a sign for masculine anime characters, but not always. And some anime styles do not require drawing a nose at all., for example, Chibi.
Step 5: Draw The Anime Mouth
For drawing the mouth, make sure its position is halfway between the nose and the chin. The mouth is simple and subtle, just like the nose.
Create a horizontal line; this should be roughly the distance between the anime character’s eyes to represent its mouth. Do not be overly concerned about drawing lips. After the nose, your character’s mouth should be the next smallest feature on the face.
Tips:
The line created as the mouth can be curved up to depict happiness and down to depict sadness. To show the character’s teeth while smiling,
Create an upward curving line beneath the horizontal line you drew for your character’s mouth if you want them to be smiling and showing their teeth.
The white space between the curved and horizontal strokes should be about half the height of the mouth. That space will be your character’s teeth.
Step 6: Draw The Ears
You can skip drawing the ears of your character if you have decided your character should have long hair, covering their ears. If not, add the ears to the side of the head. Creating an oval on each side of the ears is going to be so short they don’t touch the ears. Make sure the top of the ears aligns with the horizontal line at the center of the face. The bottom of the ears should align with the bottom of the nose. After that, create the ear flaps inside each oval.
Note:
Play with different style, shape, and size to find the preferred kind of ears for your anime character’s body.
Step 7: Draw The Anime Hair
The hairstyle on your character makes a huge difference, and this depends on if you want a male or female anime character.
Draw a little point, just about an inch from the top of the face, for a boy’s anime hair. Continue with creating curves from there.
This is to sketch the popular floppy hairstyles for male anime characters. You’ll frame these by looping the strokes up on the other side to the top to sketch palm tree shapes.
Hair on male anime characters is usually unkempt, so do not worry if it doesn’t look perfect.
To create the girl’s hair, you will have to also start with the same curvy strokes for a boy character, but limit them to one or two for a girl character.
To create longer hair, make larger curved strokes around the outside of the face. Shade the hair’s outer edges to make it darker and for it to stand out. You can add any additional strokes you want to give it more figures.
Tips:
You can search for different hairstyles ideas on Google image and Pin Interest.
Step 8: Add Finishing Touches
Finally, you have mastered how to draw anime faces, and your anime face has taken focus, and you can now add your finishing touches. You can draw two vertical lines beneath the face to depict the neck.
Note:
After you’ve finished your drawing, erase the guidelines used to guide you before painting or going over in ink, you can also leave your drawing as a nice line art piece.
Drawing An Anime Character Body: A Step-By-Step Guide
This step-by-step guide will show you how to create anime bodies.
Step 1: Sketch A Stick-Figure Image Outline For Your Character
To draw the arms, legs, and torso, make sure you use straight lines. The arms and torso should be roughly the same length, and the legs should be one-third longer than the arms.
For the hands and feet, outline the ovals. The hands should be a fifth of the arm’s length, and the feet about one-sixth the length of the legs.
Your outlined stick figure should be roughly seven times longer in height than the head to get the right proportions.
Start the arm about one-fifth of the way down the line you drew for the torso.
Whatever pose you want your character figure to present, just flow with it. You want an anime reclining, focus their legs to bend appropriately. And if you want your character waving hello, visualize a bent arm.
Step 2: Create An Outline Image Your For Your Character’s General Body Shapes
Outline your character’s torso, are s, hips, and even legs, preferably a rough outline. Do not fret if you have made lots of mistakes. You just need the outline to represent the numerous body path.
Make ovals for the top and bottom parts of the arms and legs. Also, form circles for knees and elbows. Your character’s top and bottom arms are meant to be the same length and size in proportions. Increase the thickness of their upper legs relative to their lower legs.
Create a four-sided figure that is narrow at the bottom and wider at the top for the torso. The top’s wide corners will eventually become. Your character’s shoulders will eventually be formed by the wide corners at the top.
You can also make your anime hair rest on the shoulders for long hair, especially if the dress is armless, or you can create adjustments.
An oval should also be over the torso and the top parts of the legs to make an illustration of an outline for the hips. Most anime characters are tall and thin, but you can try out different heights and even body shapes of your choice.
Step 3: Connect And Make An Illustration Of The Broad Shapes You Drew
Trace around the outside edges of your character’s body to form a single, continuous outline. At this point, start fine-tuning the various body parts, such as your character’s hands, shoulders, hips, and neck, to make them look more realistic and formulate your style.
As soon as you are through, you will get a rich image of your character’s body, focused mainly on the series of abstract outlines and shadows drawn earlier by you.
Draw around the edges on the outside of each shape that combine to form the legs, to attach and polish the shape of the legs.
The ovals for the upper and lower legs, the circles for the knees, and the shapes you drew for the feet) to make a single, seamless outline of each leg. Make the outline smooth (no gaps) so that the legs look realistic.
The arms and torso would be the same for the upper body. You can adjust the neck outlined earlier by drawing two strokes that would curve up, far from the middle of the torso.
The lines should round out the corners of the torso to develop the shoulders. Connect the hip shape you drew to the torso and upper legs.
When drawing a masculine character, broaden the chest, waist, and shoulders. If you’re drawing a female character, make the shoulders narrower, the hips wider, and the breasts outlined. Also, draw the waist in so that it is narrower.
Step 4: Remove The Stick-Figure Outline And Shapes That You Drew
Be careful when erasing to avoid accidentally erasing any of the refined, final illustrations you drew earlier on. As soon as you are through, you should have created a very seamless and neat outline of your character’s physique that lacks the original guidelines you drew from.
Step 5: Put On The Clothes Of Your Anime Character
Draw the clothes on top of your character’s body outline. For example, the sleeves of your character’s shirt over their arms and the shirt’s body should be illustrated over the torso.
Then, because those parts of your character’s body are hidden, erase any lines inside the clothes. For example, if you want your character to wear shorts, you will have to clean the parts that are supposed to be inside the shirts because they are not supposed to be a part of your anime wears nor its background.
Consider where the clothes would naturally crease and fold if someone were to wear them while drawing them. Then, to make the clothes look more realistic, make sure you are creating creases and folds.
You can go online to Google Image to get a general idea of where to crease or a sample picture showing creases.
When drawing anime characters, you can wear whatever you want. Consider a lot of popular outfits you may like to wear your anime. For example, are uniforms, suits, and even some Japanese traditional wares.
Related Articles
Conclusion: Drawing Anime Characters
Finally, after getting the fundamental idea of how to draw through these tutorials, try as much as possible to learn how to draw anime from various angles and poses, experiment to create a unique hairstyle for your anime, even facial expressions, and even design background for your anime character.
Understanding how to draw anime requires a lot of practice and having patience when following the process; you will steadily progress with your style of drawing iconic and awesome anime arts.
