
MRCOOL 4th Gen DIY Multi-Zone: Fully Explained
One condenser and up to five air handlers: that’s all you need for the MRCOOL 4th-Gen Multi-Zone. You can provide temperature control for various settings like your home, office, and server rooms. Even better, you do not need to spend much time or money to experience comfort.
Installing a regular air conditioner requires special tools and training, so getting a new one can cost a lot of money. On the other hand, the MRCOOL innovative DIY ductless system has all you need to install one yourself. Take a closer look at what MRCOOL can do for you!
We will start with an overview of the mini split air conditioner and its features. Then, you will see how this set of heat pumps can serve any setting that requires cooling or heating. We will also explore how easy it is to install MRCOOL.
Overview
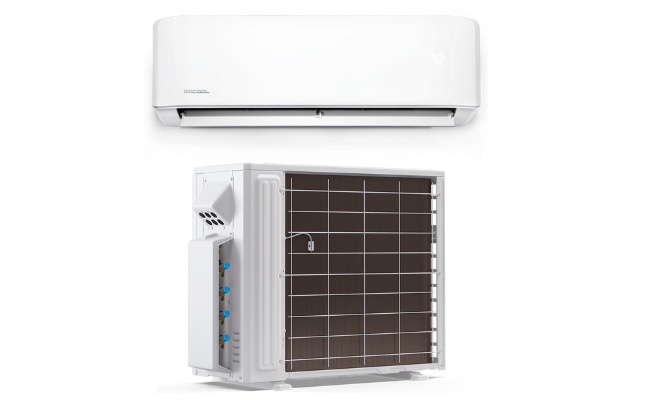
The MRCOOL DIY Multi-Zone System lets you keep up to five rooms cool or warm with only one condenser. Even better, installing these systems is as easy as drilling, mounting, and connecting!
As the name suggests, it is the fourth version of the MRCOOL DIY mini-splits. Unlike the 3rd Gen MRCOOL model, it offers more efficient heating and cooling ranges. It comes in four sizes:
- 12k BTU system that covers 500 square feet
- 18k BTU system that covers 750 square feet
- 24k BTU system that covers 1,000 square feet
- 36k BTU system that covers 1,500 square feet
This DIY mini-split air conditioner also comes with a Quick-Connect pre-charged line set with the following features:
- It is kink resistant, so it is easy to bend for amateur installation.
- It is 100% accurately pre-charged with R410A refrigerant.
- You can easily install and combine the 16-foot and 25-foot line sets with the optional DIY Quick Connect coupler kits.
- You do not need to vacuum the screw-on Quick Connect valves.
- It has strong UV protective insulation against sun damage, harsh weather conditions, and destruction from insects and animals.
Features
“One House, One Solution” – Multi-zone technology provides comfort control, and flexibility anytime and anywhere you want.
Easy DIY Installation – This MRCOOL unit comes with pre-charged R-410 Quick Connect line sets. As mentioned, you can get a 16-foot or a 25-foot line set. Also, you can easily install this ductless machine without special tools, equipment, or training.
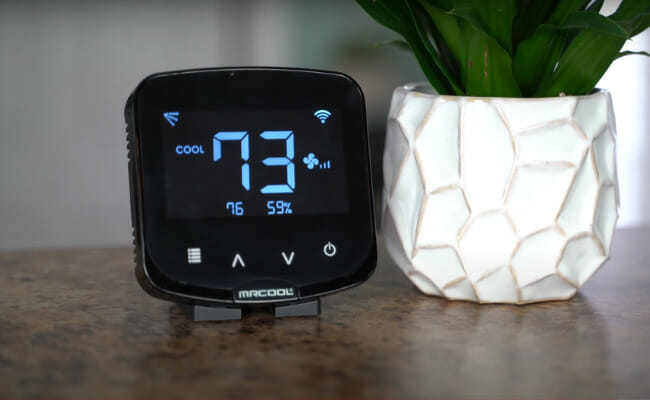
Smartphone App – You can control your MRCOOL product anywhere with your Apple or Android smart device and an Internet connection using the Smart HVAC app.
Follow Me Function – Keep the remote on hand, and the MRCOOL ductless machine will track the temperature around you to provide maximum comfort.
Leakage Detection – The MRCOOL ductless mini split system will notify the user whenever it detects low coolant levels. As a result, it could prevent damage to the compressor. Moreover, refrigerant leakage detection ensures that you are alerted to any leakage issues quickly.
Low Ambient Cooling – This easy DIY mini split system can keep your room cool when exterior temperatures are as low as 5°F or roughly -15°C. This feature makes it a suitable solution for server rooms, greenhouses, and other places that require constant cooling.
Auto Restart – The MRCOOL ductless heat pump can turn on immediately after a power outage so that you can resume enjoying perfect comfort.
Sleep Mode – You could save money by turning on Sleep Mode via the MRCOOL DIY app. You can use it with an Internet connection on any Apple and Android smart device.
Louver Position Memory – The louver will automatically adjust to the same position you set on the MRCOOL machine. As a result, you do not have to reposition them each time you turn on the device.
Gold Fin Condenser – The MRCOOL outdoor condenser can resist long-term corrosion, so it is the ideal system for people on the coast.
Digital assistant ready – The MRCOOL Smart HVAC Controller Module and app can support Amazon Alexa and Google Assistant.
Benefits

We talked about the multiple features of the MRCOOL 4th-Gen DIY Multi-Zone. It is excellent for any place that requires cooling or heating, and it provides other features.
The MRCOOL warranty stands out in the HVAC industry. It enables users to sign up for a 7-year unit replacement warranty and a lifetime compressor warranty.
Follow the terms and conditions to maintain them. For example, you must sign up for the MRCOOL Care Kit program to ensure proper maintenance. You can find the following items in the Care Kit:
- Foaming cleaning spray
- Bottle and sprayer for rinsing the 4th-Gen MRCOOL DIY unit
- Also, the Kit comes with a water collection bag with a drain attachment. You can use these to keep your house dry while cleaning your MRCOOL unit.
Also, the lifetime compressor warranty lets you get the standard 5-year parts warranty. If you do not sign up for the Care Kit, you’ll still receive the standard 5-parts and 7-year warranty.
Are you still having second thoughts about buying your first MRCOOL DIY machine? Then, you might want to check these other benefits first:
Reduced costs
People who live in extremely high or low temperatures are more likely to spend so much money on their AC units. Fortunately, the 4th-gen Multi-Zone unit can help you.
For example, the 12k BTU option has a SEER rating of 22. The word “SEER” stands for Seasonal Energy Efficiency Ratio. The higher the rating, the less energy the product needs to heat or cool a room.
Standard central systems have a SEER of 14, so the MRCOOL is more energy-efficient. In other words, this ductless mini-split machine can minimize operating costs even while servicing multiple rooms. Here are the other benefits of the mini splits:
The ductless mini-split system can heat or cool specific spots in a room. The Follow Me function can control the temperature at the location of the remote. Also, you can adjust the appliance with your digital assistant.
Moreover, the MRCOOL heat pump may let you qualify for tax incentives or rebates provided by local institutions or organizations.
You can quickly install the machine without special tools or expensive equipment because it has the necessary tools. These include screws and a mounting plate that shows where to affix them.
Better air quality
The MRCOOL DIY machine keeps your home clean. Traditional HVACS could trap allergens and pollutants that could spread into your living space and decrease air quality.
Worse, they are hard to clean. On the other hand, the MRCOOL DIY air conditioner keeps these harmful elements out with multi-stage filtration.
This heat pump contains filtration cartridges that block airborne contaminants from your indoor space. Specifically, they trap pollen, mites, dander, and microbes so you can breathe clean air all year round.
The MRCOOL DIY Multi-Zone allows you to avoid infection from the ductwork. This AC machine does not have vents that may infect your indoor space.
It blows air from multiple filters that exit from the air handler. Also, the MRCOOL DIY heat pump can reduce moisture at home. As a result, it prevents mold and mildew from accumulating inside.
As mentioned earlier, this ductless mini split lowers the temperature for extended periods with low ambient cooling. That is another feature that eliminates humidity.
More environmentally friendly

More people want to keep the environment clean, so more people are trying to reduce their carbon footprint. Fortunately, the MRCOOL DIY mini splits can help because of these features:
- It uses a safer refrigerant compared to those from traditional HVAC systems. The MRCOOL DIY mini splits use R104A, so it does not damage the ozone layer.
- As mentioned before, they are energy-efficient. These units do not have ducts that makeup 30% of the energy consumption from conventional HVACs.
- Also, you can perform MRCOOL DIY installation at any location. You will not have to use more energy and money to prepare spaces for easy installation.
- Thanks to its variable speed compressor technology, you can program the MRCOOL ductless mini splits. Moreover, you can control it via the smartphone app or Google Assistant.
Quiet operation
The MRCOOL DIY machine lets you keep warm or cool depending on weather conditions. Regardless, you want to keep your AC silent throughout its operation. Fortunately, these mini splits keep the noise down with the following features:
- The new MRCOOL DIY machine has inverter technology that helps control compressor motor speed. As a result, it can minimize sound while maintaining the lifespan of the components.
- As the name suggests, the ductless mini splits do not need noisy ducts.
- Conventional systems run silently for the first months or years of use. As time passes, they usually make more noises requiring a licensed electrician’s expertise.
- Also, these multi-splits have parts specifically designed to reduce noise, such as vibration dampeners and insulated compressors.
How to install the indoor unit

Now that you know more about the MRCOOL mini splits let us discuss its easy DIY installation. First, find a location that meets the following criteria for the indoor unit:
- Adequate air circulation
- Convenient drain lines
- Solid and firm location sturdy enough to support the machine’s weight
- One meter distance from other electronic devices
Moreover, make sure to put the appliance in an area that will not disturb other people. Do not place the mini splits in the following place:
- Any source of heat, steam, or combustible materials
- Any flammable materials
- Obstacles that may restrict airflow
- Near an area where outdoor air may hit the indoor machine
- Somewhere with direct exposure to sunlight
1: Attach the mounting plate to a wall.
Look at your new MRCOOL DIY unit; you should see a wide flat board attached. That is the mounting plate that will guide you in installing the machine. Follow these steps once you find it:
- Remove the screw that secures the mounting plate to the indoor appliance.
- Place the plate against the wall. Then, use a level to ensure its proper orientation.
- Drill holes in the spots with studs that can hold the unit’s weight correspond to the mounting plate holes.
- Secure the mounting plate with the included screws.
2: Drill a hole for connective piping.
- Make a hole in the wall of the desired location, so the refrigerant piping, signal cable, and drainage pipe can pass through.
- Use the mounting plate to know where the wall hole should be. You will need a core drill that is 3.54 (90 mm) in diameter for proper water drainage.
- Afterward, place the protective wall sleeve through the hole of the inside wall.
- Cut off the protruding parts with a saw or utility knife.
3: Prepare the refrigerant piping.
- Check the mounting plate to see how you will bend the pipe so it can pass through the wall hole.
- Then, hold the refrigerant piping at its base. Slowly bend it away from the appliance at a 90-degree angle.
- It should protrude from behind the MRCOOL system once you finish. Next, tape the drain and refrigerant pipe together with electrical tape. Do not tape the ends together.
4: Mount the indoor unit.
The unit should now be on your wall, and the pipes should be in the wall hole:
- Make sure that the ends of the refrigerant piping have a tight seal.
- Then, insert the signal wire/MC cable through the wall hole.
- Lift the indoor air handler and feed the taped wires through the wall hole.
- Next, lead the top of the air handler toward the wall.
- Fix the top of the indoor machine on the mounting plate’s upper hook.
- Then, put some pressure on the unit to verify a secure fit.
- Apply more force to the appliance to snap it onto the bottom hooks.
- Afterward, ensure a tight fit by slightly pressing the unit’s left and right sides.
How to install the outdoor unit

You may install the outdoor machine once you finish with the indoor system. Look for an area that meets the following requirements:
- Meets spatial requirements
- Good air ventilation and circulation
- Firm and solid place that will not cause the MRCOOL machine to vibrate
- Away from direct sunlight and rain
If you have snow, take necessary precautions to prevent ice buildup and coil damage. Keep the outdoor appliance away from places that meet the following criteria:
- Animals and plants
- Sources of combustible materials
- Obstacles that may restrict airflow
- Dusty locations
- Somewhere with forced water and salty air
1: Install the drain joint.
You will need to attach the drain joint to the bottom of the appliance. Check if yours has a rubber seal or not. If your drain line has one, follow these steps:
- Attach the rubber seal on the end of the drain joint that connects to the outdoor machine.
- Then, insert the drain joint into the hold in the unit’s base pan.
- Rotate the drain joint at a 90-degree angle until it clicks in place.
- Connect a drain hose extension to the drain joint. Note that the MRCOOL DIY appliance does not come with this accessory.
If the drain joint does not have a rubber seal, place it into the hold of the unit’s base pan. Then, link a drain hose extension to the drain joint.
2: Anchor the outdoor unit.
You anchor the outdoor AC unit to the ground or the wall using M-10 bolts. Read the manual to see the correct dimensions. If you will install your MRCOOL DIY unit to the ground, follow these instructions:
- Mark the positions for four expansion bolts using the Mounting Dimensions chart.
- Next, pre-drill the holes for the expansion bolts.
- Clean dust away from the holes.
- Afterward, place a nut at the end of each bolt.
- Hammer them into the pre-drilled holes.
- Next, remove the nuts from the expansion bolts, then place the outdoor system on the bolts.
- Place a washer on each bolt, then reinstall the nuts.
- Lastly, tighten each nut using a wrench.
Affixing the outdoor system to the wall requires the same instructions. However, you should ensure the wall is strong enough to support four times its weight.
Conclusion
We hope this guide shared all you need to know about the MRCOOL DIY system.
If you need any tips regarding the process, you can learn more on the MRCOOL DIY website. You can also watch the video for the MRCOOL DIY Multi-Zone. These resources will show you how to install the system in real life, so you can follow along while doing it yourself.
You can also check out the MRCOOL website to find out more about the heating and cooling solutions they offer.
Please follow safety precautions when installing your AC unit. Wear safety goggles while drilling the wall holes. If you are familiar with handling electrical wiring, please request help from a licensed electrician.
FAQs
Are these mini splits worth it?
The great thing about these mini splits is that you can spend less money on cooling more rooms. Also, they have a SEER of up to 22, so they are energy efficient.
Do the mini splits work with a digital assistant?
You can control the units with your Google Assistant or Amazon Alexa. You can also use the MRCOOL DIY app available on Apple and Android.
How do I know what units I need?
You’ll find a configurator tool on MRCOOL’s main website! This can be a great help in choosing the system you need for your home. Follow the website for the latest updates.
